 news
newsHow are your orchids doing? If they're like mine they adjusting after a great summer outside.
I've been asked if the COC is planning to set up a display at the World Orchid Congress 1996 in Brazil. After all Vancouver is hosting the 1999 World Orchid Congress, and it would be appropriate to have a Canadian exhibit. This is something you should think about. Perhaps we could discuss the possibilities with the Vancouver WOC organizers at the COC convention in Edmonton?
It's with some regret that I must tell you that Howard Ginsberg is stepping down as the coordinator of the COC speakers tour.
Howard has been arranging the tours longer than I've been involved with the COC. We'll miss Howard as the speaker tour coordinator, but he will continue to help us with the Charitable Status Initiative. Landis Stanlake from the Manitoba Orchid Society has begun to coordinate the tours in 1995. If you have any ideas for the tour, give Landis a call now.
I had an opportunity to participate in the Eastern Canada Orchid Society Orchidfete 1994 in Montreal this October. This was the first AOS judged show for the society and it was a smashing success with lots of plants and huge crowds. ECOS's success is inspiring to clubs who have never hosted an AOS show. It can be done!
I'm always eager to hear from you. What do you expect of the COC? Give me a call, drop me a note or send me some e-mail and let me know what's happening in your area.
Steve Saunders
I have used the same plant of Cattleya Cherry Chip (Angelwalker x intermedia var. aquinii 'Vinicolor') to make and register four hybrids. My specimen is a compact, unifoliate plant. It flowers twice a year, bearing one or two 9cm (3.5 in) wide, fragrant, splash-petalled blooms per inflorescence. The flowers open white with cherry red splashes on the petals and lip. The white portions mature to a uniform light pink. The lip is broad, the flower round, but the splashed petals project forward. This trait is annoying as it can distort the flower shape. Cattleya walkeriana var. alba, a parent of C. Angelwalker, has determined the C. Cherry Chip plant size and its blooming habit. The flower stems are short, the flowers held just above the foliage. Sometimes leafless stems bear flowers; often the buds emerge uncovered and without a protective sheath. Cattleya intermedia aquinii 'Vinicolor, the peloric grandparent, has given rise to the splashed petals that emulate the lip.
The first two hybrids to bloom and be registered were C. Fruit Salad (aurantiaca x Cherry Chip) and Epicattleya (Epc.) Melon Surprise (Epi. pseudepidendrum x C. Cherry Chip). These hybrids have been previously discussed in the COC Newsletter. In both hybrids, the C. walkeriana genes have influenced plant size and flower shape. One-third to one-half of the C. Fruit Salad progeny have splashed petals although all have inherited the compact plant habit and the broad C. walkeriana lip. Those with splashed petals have also inherited the forward-facing petals. A few of the clones bloom twice a year although most flower only once. Interestingly, all of the Epc. Melon Surprise grex bloomed to date have flowered every four months or as a new growth matures. So far, they have not rebloomed from the old inflorescences although the old pseudobulbs continue to expand in girth. Typically, the two flowers are 8cm (3 in) wide, the rich yellow lips, 2.5cm (1 in) wide. The petals and sepals are a uniform apple-green aging to yellow-green. Tiny red speckles are randomly distributed in the petals and sepals but not in the lip. The compact plants resemble the Epidendrum parent but stand only 15-20 cm (6-8 in) tall. The grex is very uniform to date.
I recently bloomed two new hybrids. These are C. (Cherry Chip x Loddiaca) provisionally registered as C. Doctorbird, and Lc.(C. Cherry Chip x Lc. Roy Finley) provisionally registered as Lc. Memoria Evelyn Light. Cattleya Loddiaca is (aurantiaca x loddigesii). Cattleya loddigesii has mauve pink flowers and a beautiful lip edged mauve and sporting a yellow halo within. Lc. Roy Finley is (Mari Reyes x C. aciandiae). This hybrid flowers two to three times a year, bearing up to six - 9 cm (3.5 in) flowers resembling the C. aclandiae parent. Petals and sepals are brownish-green, heavily blotched reddish brown. The lip is blunt and cherry red.
All plants bloomed to date are flowering at four-month intervals. The plants are compact, the flowers approximately 8-10 cm (3-4 in) in diameter. So far all of the Lc. Roy Finley cross bear flowers without sheaths whereas the C. Loddiaca hybrid presents buds in sheath. The flowers of both grexes are various shades of pink, speckled overall with burgundy. Lips are quite variable.
The first clone to bloom of the Lc. Roy Finley hybrid shows the influence of both parents. Not only are the large flowers peloric and boldly splashed dark mauve pink but the petals and sepals are heavily blotched burgundy. The lip is flat and very dark mauve pink. Unfortunately, the large splashed petals project forward spoiling the general shape. The redeeming feature is a heavenly fragrance that increases as the flower ages. This plant has already bloomed twice since May! The second clone to bloom is a mother's dream. A lovely clear pink, waxy 8 cm (3 in) wide bloom is well displayed above a 9 cm (3.5 in) tall pseudobulb. The petals and sepals are daintily speckled burgundy with perhaps a greater clustering of dots near the petal tips. The speckles are carried through to the back of the flower. The flower is flat but a bit starry. After two weeks, the flowers become heavily fragrant. Flowers last five to six weeks. interestingly, once the pollen is removed, the flower loses its spots and becomes concolor pink. The third plant to bloom is a very attractive, splash-petal with cherry red splashes on a light pink ground. Contrasting veining in the lip and petals is pronounced. The sepals are heavily blotched burgundy red especially near the tips. The flowers are reasonably flat and round given the breeding. Plants of this cross have so far borne only one or two flowers per inflorescence but show promise of more as they mature. What is most interesting is that all plants bloomed to date are basically red, pink and white. All the green colour reminiscent of the C. aclandiae parentage has either been suppressed or left only in the blotched areas of the flower, where overlaid by pink, appears burgundy. I really look forward to blooming more of this cross now that it has justified its space in my collection.
The C. Loddiaca hybrid with C. Cherry Chip presents full rich pink dainty flowers with a lip not much different from that of C. loddigesii. Since C. loddigesii is doubly represented in the hybrid, being a great grandparent of C. Cherry Chip, it is perhaps not surprising that its influence is so strong. The lip is a bit flatter than the species having a strong yellow halo within while the outer edge is daintily coloured pink. It really makes the flower smile. There are a few scattered tiny red speckles in the petals and sepals. It remains to be seen whether or not any peloric individuals exist in those yet to bloom.
More than 30 hybrids have been registered using C. walkeriana as a parent, many more if one counts hybrids with the species further back in the lineage. Unfortunately it is rarely known which form of the Cattleya was used in a particular cross. There is a natural hybrid of C. walkeriana and C. aclandiae, Cattleya Measuresiana, although I have never seen it in bloom. The awarded plant, "C/J's", AM/AOS (80 pts.), carried three pale lavender flowers spotted dark magenta. The spots carried through to the back of the flower. Natural spread was 8.7 cm. This award was given on April 16, 1988. It would seem that all the green or brownish green of the C. aclandiae parent had been suppressed or sidelined as in my hybrid.
Cattleya walkeriana can be an influential parent even when several generations removed. Its influence can extend to plant size and habit, flower shape and blooming frequency. The plants are small, the flowering frequent and the flowers long lasting. Because I have only used one C. Cherry Chip plant in making the hybrids described in this article, I cannot comment on the relative clonal influence from this grex or from the species in general. I have seen hybrids such as Lc. Tropic Charm (Lc. Janet x C. walkeriana 'Penditive') and C. Walkerinter (walkeriana x intermedia) where the plant habit is sprawling. Perhaps some clones of C. walkeriana pass on a sprawling habit to their progeny. H & R Nurseries in Hawaii have been using C. Cherry Chip extensively to make such lovely hybrids as Lc. Love Knot (x L. sincorana). This hybrid is compact and the flowers shapely, some attractively splashed deep pink. I would like to attempt crosses using a superior C. Cherry Chip as a partner to C. aurantiaca, C. Loddiaca and Lc. Roy Finley to see what results from the union.
Marilyn Light, Chairperson, COC Education Committee.
Just when you thought you had found a nice safe hobby. Well, guess what .... you could be allergic to your orchids.
Cases of dermatitis due to contact with orchids were described as early as 1875. In 1980, Dr. Hausen from the Dept. of Dermatology, University Hospital, Hamburg, West Germany, reported the case of a 68 year old retired man who spent his leisure time breeding orchids. He had several outbreaks of eczematous dermatitis (an inflammation of the skin, of acute or chronic nature, presenting as moist or dry lesions and often accompanied by itching or burning) over four years always after handling orchids. One especially severe attack occurred after he repotted 500 Paphiopedilum haynaldianum plants. The eczema started on the left palm and spread to involve the entire left hand and forearm and finally the right hand and forearm as well. The eczema lasted for two weeks.
Dr. Hausen also reported the case of a 55 year old female office worker who appeared in his office with lesions and blisters on both hands. The patient had cultivated Cymbidium orchids for several years and had begun to cultivate Primula obconia. Allergy patch tests showed reactions to both Cymbidium and Primula juices.
The culprit behind these allergies is a group of chemicals called quinones. In orchids, quinones are present in the hairs which occur on some species such as Paphiopedilums, some Phalaenopsis, some Dendrobiums, Cymbidiums and Vanilla. The quinones are produced as defensive agents against fungal and predator attacks (including collectors). The contact toxicity is quite similar to that of poison ivy and poison oak.
Quinones have been identified in over 50 different plant and wood species; woodworkers who use exotic woods can develop sldn problems.
In the 1980's some researchers from Singapore visited five of the largest orchid farms in Singapore and interviewed employees about past or present skin trouble. At the time of the survey no skin disease was found although there had been short-lived outbreaks of skin problems which followed the introductions of a new fungicide or insecticide and which stopped when the new substance was withdrawn.
The conclusion to these studies is that although allergies to orchids are very rare, people can and do develop sensitivities to their plants. So, don't throw out your orchids, but if you develop any skin problems be aware of the possibility of an allergy to orchids. References:
Ruth Ann Moger, Orchid Society of Nova Scotia
In part 1, I described a wardian case type cabinet designed for the cultivation of the cooler growing pleurothallids. This cabinet is cooled with a refrigeration unit and is controlled to maintain a temperature range of 10C to 15C. Relative humidity is kept at more than 80% with an ultrasonic humidifier and good air circulation is maintained by the 2 fans in the cooling unit. Lighting is by 4 x 40 watt fluorescent tubes.
This cabinet is used for the cultivation of the cooler growing species and hybrid masdevallias including the species rosea, yungasensis, deformis, wurdackii and many others. These species have flourished in the cool, buoyant atmosphere that the cabinet provides.
And what of the so-called "heat tolerant" masdevallias; would they also respond to a similar controlled environment? The second cabinet was designed to allow a higher temperature range but still give some control over the high temperatures we experience here in Montreal during July and August. Also, this cabinet is designed for ease of assembly and disassembly so that it will serve a dual purpose - growing AND exhibiting.
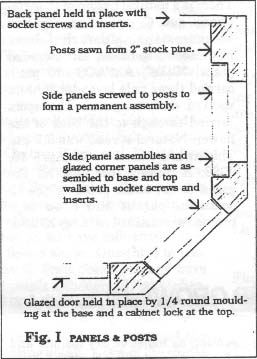
The cabinet structure, which measures 48' x 31W'x 35" high, consists of 6 posts, 5 panels (3 of which are glazed), a back, a top and a base. It is made entirely with select grade pine. The front corners are angled at 45° to allow for a greater viewing area when the cabinet is used for exhibiting but it should be noted that this is some-what inconvenient for growing purposes. (Fig. I shows the general arrangement of posts and panels.)
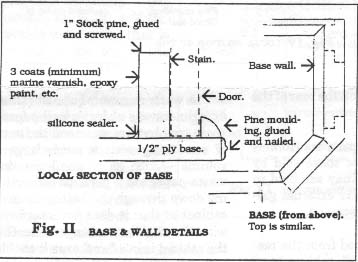
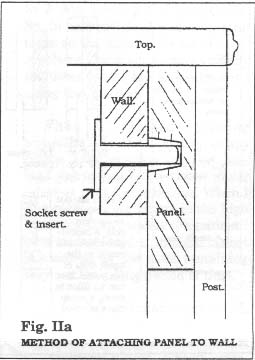
1" x 3" pine 'walls' are glued and screwed to the top and the base. The cabinet is assembled by passing socket screws through the walls into inserts in the posts and side panels. The back panel is 3/8" ply and is secured with socket screws into inserts in the rear posts and the top and base walls. (Fig. II and IIa show this method of assembly) The glazed front panel, which is completely removable for ease of access, is held in place by trapping it between the base wall and a strip of quarter-round moulding at the bottom and secured at the top with a standard cabinet barrel lock into the top wall. When assembled, the cabinet structure is very rigid.
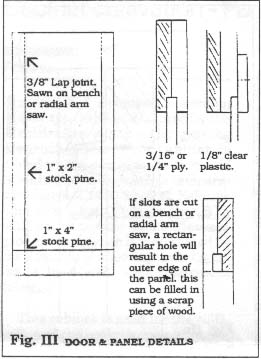
The side panels and the removable door are constructed using simple glued and screwed lap joints as showed in Fig. III. The slots for the 3/16" or 1/4" ply panels and the 1/8" rabbet for the glazing can be sawn or routed prior to assembly. The glazing should be secured with screwed in place pine moulding so that the glazing can be easily replaced should it be damaged.
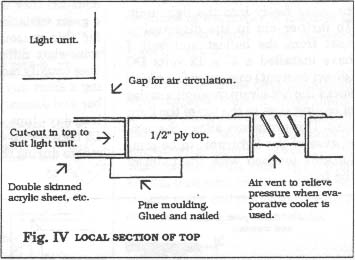
A rectangular hole to suit the dimensions of the selected light unit is cut out of the top and glazing installed as shown in Fig. IV. It is recommended that an insulating glazing panel be used to help in preventing heat from the light unit entering the cabinet. I have used 5/8" double skinned acrylic sheet (which looks like rectangular glass tubes joined together and is often used in modern greenhouse construction.) but 5/8" thermopane glass or even a sealed double layer of l/8" plastic sheet with an air space between would be suitable.
The cabinet stands on 4 removable tubular steel legs (Ikea) but if the cabinet is to be used as a growing case only, it would be more practical if shelving or cupboard space were built into the base.
A (kitchen sink) drain and plug is installed in the center of the base to allow excess water to be removed from the cabinet.
The inside of the base is finished with multiple coats of epoxy (laundry tub) paint and the joint between the wall and the base thoroughly sealed with silicone sealant. The other parts of the cabinet interior are finished with white moisture resistant paint and the exterior with a transparent yellow-green stain.
I have used ceiling lighting "Eggcrate" panels for the shelving, supported where necessary, with 3/4" aluminium angle. The bottom shelf rests on the base walls and the upper shelf on adjustable supports directly above the cooler. The shelves are just wide enough to accommodate standard 21"x 11" plastic growing trays. Actually, I prefer a stepped shelving arrangement (as described in part 1) since this allows easier access to individual plants.
Fortunately, Masdevallias and other pleurothallids are not very demanding in their light requirements. Rhodehamel in his book, "A Masdevalha Cultural Guide", recommends light levels between 600 and 1400 ftc (foot candles) combined with a short day (winter) of about 13 to 15 hours up to a long day (summer) of 17 to 18 hours. A light level within this range can be achieved using either 6 x 40 watt wide spectrum fluorescent tubes or a 150 - 175 watt HID (high intensity discharge) light unit. A heavy duty grounded timer will take care of the day length.
In this cabinet I have installed a 175 watt metal halide light unit mounted 3/4" above the glazing panel on 4 wood blocks (Fig IV). The purpose of the gap is to allow air to circulate freely into the light unit. To further aid in the dispersal of heat from the ballast and bulb I have installed a 3" x 12 volts DC (direct current) computer fan which sucks the hot air up through a series of cooling slots in the top of the light unit. This procedure allows the metal case of the light unit to be comfortably touched with the palm of the hand!
HID lights produce a very intense central bright spot and to overcome this problem I have placed a small (9" x 6") rectangle of black nylon fly screen directly below the center of the bulb. This gives a much more even distribution of light across the width of the cabinet. Using a light intensity meter I get approximately 1000 ftc at average leaf level on the top shelf and 600 ftc on the bottom shelf
This light level appears to be suitable for most pleurothallids but several masdevallias, including the species M. nidifica, showed their displeasure of being on the top shelf by turning bright red and dropping some leaves, but recovered when placed lower in the cabinet. With this level of light intensity, I recommend a light unit to shelf distance of no less than 18" and no more than 33".
Since the majority of masdevallias come from Columbia, Ecuador and Peru (approximately plus/minus 10° to 15° either side of the equator), they would not experience a great variation in day length and for this reason I have adopted a somewhat different regime to the ones usually recommended. I am using a short day (November, December and January) of 12 hours and a long day (June, July and August) of 15 hours with incremental adjustments during the spring and fall.
I experimented with a 10 hour short day (perhaps without a sufficient adjustment in watering and fertilizing) which resulted in weak growth, yellow leaves and poor root development and for this reason was not pursued. For the long day I see no valid reason at this time in lengthening it beyond the 15 hours but records of flowering frequency and growth rates may persuade me to make adjustments at a later date.
Pleurothallids, including Masdevallias, enjoy good air movement. But it must be remembered that in the close confines of a cabinet the plants may be only inches away from the source of the air movement. Even if the humidity is very high, the constant stream of moving air leaving a fan will desiccate a plant in short order. Therefore, be sure to position fans so that the moving air passes over the plants, under shelves, or preferably, deflected off the cabinet interior surfaces.
In this cabinet I have used 3 fans that are dedicated to air movement. Also there is a fourth fan in the evaporative cooler and yet another used for humidification! The 3 air movement fans are 3" x 12 volt DC computer fans, 2 of which are positioned in the rear top corners of the cabinet and angled so that they deflect air off the front glazed door and the other is in the bottom of the cabinet and deflects air off one side of the evaporative cooler.
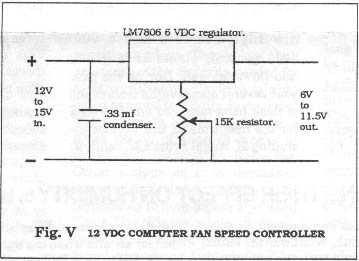
Even though the air is not directed on the plants, I still considered the air velocity to be too great so an electronically minded friend designed a DC voltage regulator (see Fig. V) that is adjustable between .6 and .9 of the full fan speed.
With this arrangement of multiple fans the "air stream" effect is largely avoided and air circulates to all used areas of the cabinet.
I am combining the discussion of cooling and humidification because in this cabinet they are closely interrelated - they both use outside (room) ambient air and share the same water reservoir - although the cooling is controlled and humidification is not.
Since the cabinet was designed for the cultivation of the more heat tolerant pluerothallids, I decided that refrigeration should not be necessary. The design objective was to allow the daytime temperature to rise (within reason) to the room ambient during the day and to take out about 5°C during the night. An efficient evaporative cooler should be capable of performing this task depending, of course, on the room ambient temperature and (particularly) humidity. The problem was to find one that was scaled down to a size suitable for cabinet culture.
I investigated several table-top humidifiers that work on the evaporative principle including those marketed by Sears and Holmes. The problem with these units is that they must be opened to refill the water reservoir which is not very convenient inside a cabinet. Also, these units wick up the water from the reservoir in which they are continually standing which does not distribute the water evenly over the entire pad area. The answer was to custom design and make a suitably sized unit as an experiment.
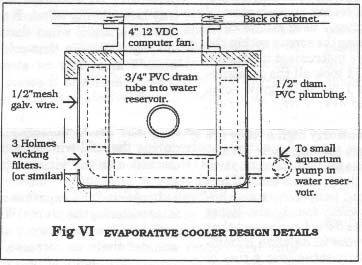
Basically the cooler design is a square box with rectangular cutouts in the front and sides for the cooling pads, a removable top for internal access and a PVC tube in the base to allow the water to drain back into the reservoir. It is powered by a 4" x 12 volt DC computer fan running at full speed) and, as previously mentioned, introduces room ambient air into the cabinet.
The fan also supports the cooler box on the rear of the cabinet.
Suitable cooling pads are Holmes HWF50, HWF60, or those sold by Sears and others. They are held in place by internal and external galvanized wire mesh screens.
Water is circulated from the reservoir through PVC tubing by a small aquarium submergable pump - I used a SACEM 54S, but there are many other similar models available - two rows of 1/8" diameter holes were drilled in the PVC tubing directly above the cooling pads to allow water to trickle down through the pads when the unit is working. The fan and pump are controlled simultaneously by a Sears 24 volt cooling thermostat. Fig. VI shows an internal plan view of the cooler.
The cooler, of course, provides some humidity when it is operating, but to maintain the humidity at a more constant level I have installed a small aquarium air pump (ELITE 800 by Hagen Inc.) on the outside rear panel of the cabinet. This pump pushes room ambient air through a 1/8" diam. plastic tube to an airstone located on the bottom of the water reservoir. A 3" x 12 volt DC computer fan positioned above the reservoir and angled down towards the emerging bubbles, distributes the moist air around the cabinet. Relative humidity is maintained at between 70% and 90% using this method.
The water reservoir I used for this experiment was a plastic wall-paper paste tray but I recommend the use of something with a much larger volume - such as a small plastic waste-paper bin - perhaps protruding down through the bottom of the cabinet so that it does not interfere with the shelving arrangement. (If the cabinet is in a "wet" area it could be connected to the house water supply and the water level controlled by a float valve.)
It is important that the cabinet, shelving and cooling system be designed so that the water reservoir can be filled with a minimum of disturbance to the plants. A surprising amount of water is evaporated in this cabinet and the reservoir requires replenishing almost every day.
As you may have noticed from the preceding text, all electrical components installed inside the cabinet are restricted to low voltage, either 12 volt (fans) or 24 volt (cooling thermostat). This has been done as a safety precaution - the environment is very moist at all times and at least once a day I heavily mist all of the plants - 115 volt house current would be an everpresent danger in these conditions. The one exception to the low voltage rule is the evaporative cooler pump, but since this is a sealed unit, it presents no danger.
All of the electrical components - except the timer for the light unit and the aquarium air pump - are mounted on a 18" x 7" removable wood panel that is screwed to the top of the cabinet. This arrangement allows the components to be neatly and permanently wired together with all internal cabinet wires routed to a terminal strip on the rear edge of the panel. A wiring harness on the rear of the cabinet carries the power to the fans and thermostat inside. The light unit timer is mounted on the side of the cabinet to allow the day length to be easily changed and the air pump is mounted on the rear of the cabinet adjacent to the water reservoir.
The evaporative cooler requires a 12 volt transformer for the fan, a 24 volt transformer, 24 volt thermostat and a 2 pole (24 volt/115 volt) switching relay to operate the pump. These components can be purchased from any heating supply store.
The use of multiple air movement fans draws too high a current for an inexpensive 12 volt radio transformer to be used, so a good quality, high output voltage regulator is recommended. They cost $50 to $80 and can be obtained from any electrical supplies store including RadioShack.
When I started growing pleurothallids the majority of my plants were growing in New Zealand sphagnum moss either under lights or in the greenhouse. When I first placed these plants in the high humidity environment of a cabinet, I soon encountered a problem of root loss caused by the moss remaining very wet for a long period of time.
After experiments with various mixtures, and after the loss and near loss of many plants, I have stabilized my collection in the following mixture:
The mixture is well soaked with water and then allowed to dry so that it is just pourable - I find that in this condition the mixture will settle around the roots by tapping the side of pot and does not need tamping. All plants are held in place with homemade wire clips until established.
Unfortunately most nurseries supply pleurothalhds potted in N.Z. moss, and recently I have encountered one nursery (Orchid Zone) that grows in a rock wool mix. I find it very difficult to re-establish these plants into a "normal" mixture. The plants must grow a completely new set of roots and during this period they are very susceptible to over watering and other forms of stress. I now mix 1 part of chopped sphagnum moss to the above mixture for the initial re-potting and I feel that this has helped.
To ensure rapid draining of excess water after watering I always drill additional holes and/or cut notches out of the bottom corners of the pot. Crocking is restricted to a small layer of selected Perlite approximately 3/8" diameter.
Has growing in this cabinet been a success? The answer to this question is a qualified 'Yes it has'. For 10 months of the year the cabinet has functioned within the design parameters but the heat and humidity of July and August resulted in higher internal temperatures than I consider desirable. However, let me hasten to add that the plants do not appear to have suffered. (i.e. the conditions were more stressful to the owner than to the plants!)
As was to be expected, once the ambient humidity rose above 75% the evaporative cooler ceased to reduce the temperature and on several occasions the thermometer registered over 25°C during the late afternoon period. Fortunately we have very few nights when the temperature remains much above 20°C.
In general, plants have grown and flowered well. During the past year several masdevallia crosses out of flask have matured and flowered for the first time in this cabinet including M. Angel Frost x M. velifera, M. chararensis x M. tringularis, and M. Copper Angel x M. decumana.
I have used this cabinet to display pleurothallids at two orchid shows - Montreal and Toronto - and it received considerable attention from the general public at both. I was awarded the Canadian Orchid Congress Show Trophy for the most artistic display at the Ottawa show.
A third cabinet is under construction - and also in use - and will be finished during the coming winter. This cabinet is 8 feet long, will be fully insulated and cooled. It features a 250 watt Metal Halide light unit mounted on a linear light mover. More on this in part 3, some time next year.
Malcolm Adams, Eastern Canada Orchid Society
An interesting question was posed recently on the Orchid Electronic Mail Link. What was the effect, if any, of plants on their own surrounding humidity? I did some measurements on my own plants and discovered some interesting things. I used MICRONTA thermometer/hygrometers placing the sensor within the mass of foliage. Accuracy for this instrument is plus/minus 2% RH and 0.5 degrees C. I took all the measurements in my playroom where I normally grow some Phalaenopsis under lights (and over a tray of water). Since I had recently brought in trays of Odontoglossums, Paphiopedilums, etc., because of frosty nights (they are quarantined in this room before moving their permanent winter location) I was able to measure the temperature and humidity in amongst these plants too. All had been equilibrated to the ambient temperature and humidity of the room for about twenty-four hours. Room temperature was 20.8 C; RH was 54%. I can report that there was no meaningful difference in Relative Humidity amongst plants growing in my setup over a tray of water (54%) or without water (51%). Neither was there a meaningful difference in Relative Humidity between different groups of plants, growing in different media. Temperature varied from 19.5 to 21.1 degrees Celsius from place to place within the room; humidity varied from 51% to 55%.
Humidity of the outdoor air was probably the more meaningful driver in this situation. When there is a small temperature differential between the outdoor and indoor air and when the outdoor air is somewhat humid (60% RH, its effect greatly overwhelmed any pebble tray humidifying effect. It will be interesting to repeat this experiment when the outdoor air is very cold i.e. -30C (yes, it gets that cold in Ottawa/Hull!). That is when I must rely on a vapour barrier between my growing area and the rest of the home to ensure the humidity generated through misting stays with the plants and does not escape into the house. We normally keep the house humidity at no more than 30% RH during the cold winter months to avoid excessive condensation on the windows (and in the walls).
I repeated the experiment the next night before and after watering the plants. While there was still no meaningful difference between trays before watering, there was definitely an increase, from 58% RH to 70% RH, around the plants after watering. I presume that that this was caused through water evaporating from the surfaces of bark and foliage. Misting may be the best way to humidify afterall.
Marilyn Light, Chairperson, COC Education Committee.
Green plants require light for three major functions. These are:
Light energy is used by plants to grow, through the process called photosynthesis. Different orchids require different quantities of light to achieve optimum growth. Some such as Paphiopedilum wardii require less, while others such as Vanda teres require more. Seedlings generally require less than adults of the same species. Too much light is unecessary and can in some instances be harmful. Reddened foliage and stunted growth could be a sign of too much light. Too little light coupled with overly generous watering and fertilizer application often leads to floppy growth.
Certain orchid seeds such as those of Paphiopedilum, Cypripedium and Galeandra germinate best in subdued light to total darkness. Blue light seems to be the factor that hinders germination in sensitive species. I would expect that Cattleyas could germinate in the dark but their further development would be greatly delayed, if not halted, if they were not exposed to light soon after germination. I germinate Cattleya alliance seed in the light using 12 - 16 hours exposure under two x 4OW wide-spectrum fluorescent tubes(1 foot beneath the tubes). Germination can take from 48 hours to several weeks. The time taken will depend upon the species/cross, the seed vigor and temperature. Germination generally is quicker above 20C (68F) than below. Seven days is average. Germinating embryos quickly become green. If Cattleya protocorms grow but do not become green or if they gradually or suddenly become yellow after being green then something is possibly wrong with the medium or with the flask environment. For more ideas see Flasking Problems and Solutions in The Orchid Review 102:104-108. 1994.
Lighting for photoperiod is often misunderstood since the plant is actually responding to the length of night rather than to the length of day. Little quantity of light is required to signal a plant response but that light must be of the appropriate quality. Approximately 150- 400 mW/m-2 of red light will sensitize a plant. This is less than one-tenth of the quantity needed for photosynthesis. Certain plants when exposed to a daily dark period of appropriate length (night) for a given period of time (3 weeks or more), will respond by flowering. Other actions such as dormancy may be similarly controlled. Those responding to long nights are called Short Day Plants while those responding to short nights are referred to as Long Day Plants. The induction period could vary considerably between species. Photoperiod sensitivity inheritance can be quite unpredictable in complex Cattleya hybrids. Some are day-neutral, that is they flower at any time irrespective of day length. The best advice when dealing with orchids of unknown photoperiod sensitivity is to vary photoperiod during the course of a year. i.e. October to March 12 hours day/12 hours night; April to September 16 hours day/8 hours night. Learn which hybrids bloom in which season and note their response. You may then be able to manipulate the blooming cycle to accommodate show dates, etc.
The daily dark period, whether it be 12 hours or 16 hours must be uninterrupted. A sensitive plant will be affected by even short light interruptions during the dark period. Thus, illuminating the growing area/greenhouse during the night, for example, to search for slugs, can disrupt the photoperiod response. Photoperiod-sensitive orchids such as Cattleya mossiae will equally be affected by streetlight and house lighting but not by moonlight. If you expect to illuminate the growing area during the dark period, drape sensitive plants at or before dusk with black, light-stopping fabric. On the other hand, if you wish to artificially emulate a long day/short night, you can do so by illuminating the plants for alternating short periods during the night. For example, you can illuminate on a 4 hour ON, 4 hour OFF cycle during the night. This technique is sometimes used not only to lengthen the effective day (shorten the night) but also to save energy costs. It is a bit hard on the fluorescent tube starters though.
Lighting for photomorphogenesis deals with the effect of light quality, particularly that of blue light, on plant development. Plants grown in the absence of blue light can display abnormal growth. While this need not be a concern for those growing orchids with natural light or with artificial light supplementing natural light, it could conceivably be a concern for growers using high-pressure sodium (yellow-orange) lamps as the sole light source for their orchids. Ideally, high-pressure sodium lamps should be used in combination with either metal halide lamps or fluorescent tubes to better balance the light spectrum.
Marilyn Light, Chairperson, COC Education Committee.